

Measuring your stairs and calculating the amount of carpet underlay needed is a simple process which doesn’t require much experience. Although you want to be as accurate as possible, each individual measurement isn’t critical because you will have allowances within your measurements to help negate small mistakes.
However, it’s still important to take your time and double check your measurements – over ordering can mean unnecessary cost for your project, while not ordering enough can mean delays and frustrations.
In this guide
What is metres squared (M²)?
Most stairs underlay comes in bags of metre squared (M²), usually in 10m² or 15m² increments. A metre squared is the area of a square with sides 1 metre in length.
You will need to calculate how many metres squared your stairs and landing is so you can order the correct amount of underlay.
It is worth noting that the area is unlikely to measure an exact number of metres squared. The figure you arrive at in your calculation is more likely to be a decimal number, such as 17.25m².
Converting feet and inches
Underlay is supplied in units of metres squared, so you should capture your measurements in centimetres and metres.
If you prefer imperial measurements, an online size convertor can help (Google is able to convert imperial to metric quickly and easily), while most tape measures have both imperial and metric measurements too.
How does measuring stairs differ from a normal room?
Stairs and landings are made up of different types of raised steps, each with a slightly different method of measuring and fitting. Most houses have 13 steps in total, which will be any combination of landings, straight steps, winding stairs, bullnose steps and half-landings, which is why measuring stairs is slightly more involved than measuring a room.
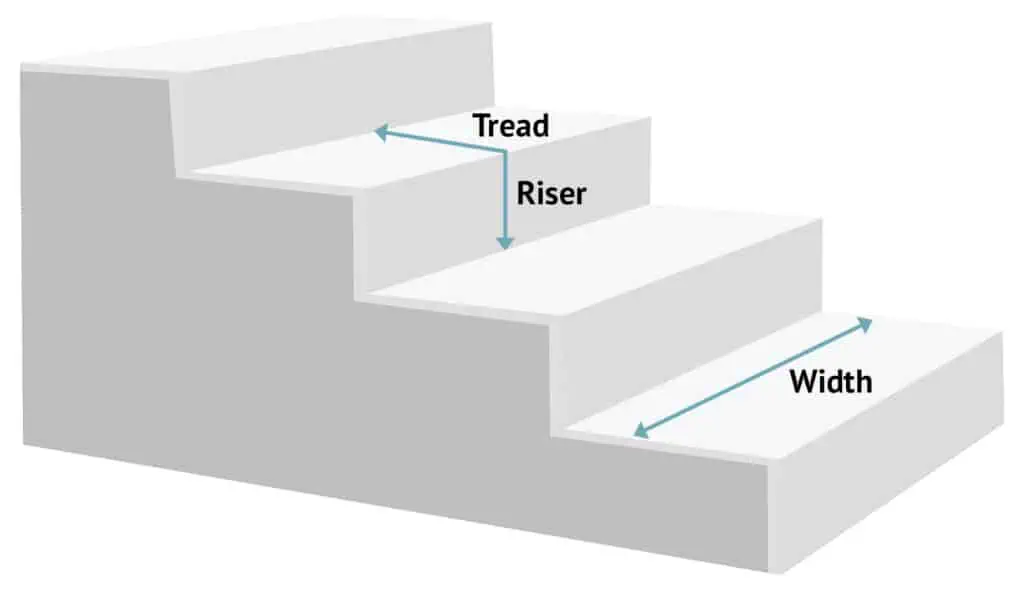
You will need to decide before measuring your stairs whether you intend to put underlay on the riser (vertical part) of the step. The tread (horizontal part) will definitely require underlay – this is the part of the stair that you stand on and will need underlay in order to provide comfort and protect your carpet from wear. The riser doesn’t necessarily need underlay as this part of your step shouldn’t get any wear.
However, we would always recommend putting underlay on this part as it prevents sagging of your carpet, guarantees a cleaner finish and will make the job of fitting much easier.
To avoid confusion, all of the methods below will assume underlay is to be fitted to both the tread and riser.
Tools you’ll need to measure stairs
All you require is a pen/pencil, a sheet of paper (graph paper is best, but not essential) and a metallic tape measure.
It’s good practice to draw a sketch of your stairs and landing before you start. Highlighting or ticking off the areas once they have been measured will help to ensure no area is missed or measured twice.
How to measure a landing

Landings can come in any shape and size – they will be as unique as your house itself. But the most basic and most complex landings can be measured using the same, simple method, so there’s no need to feel daunted.
Using a full sheet of paper, draw a rough sketch of your landing (this doesn’t have to be to scale). Next, break the landing down into squares or rectangles on your drawing as this will help to identify which parts of your landing you have measured.
If you are able to envisage separate squares/rectangles on your plan, you will ensure you measure each part of the landing only once; meaning you won’t over or under order.
Unlike when measuring for a carpet, underlay can be installed in several smaller pieces joined together, whereas carpets have to be laid in one continuous piece. This makes the measuring process much easier as you do not have to think about where joins and breaks would fall; you are just aiming to measure the overall area.
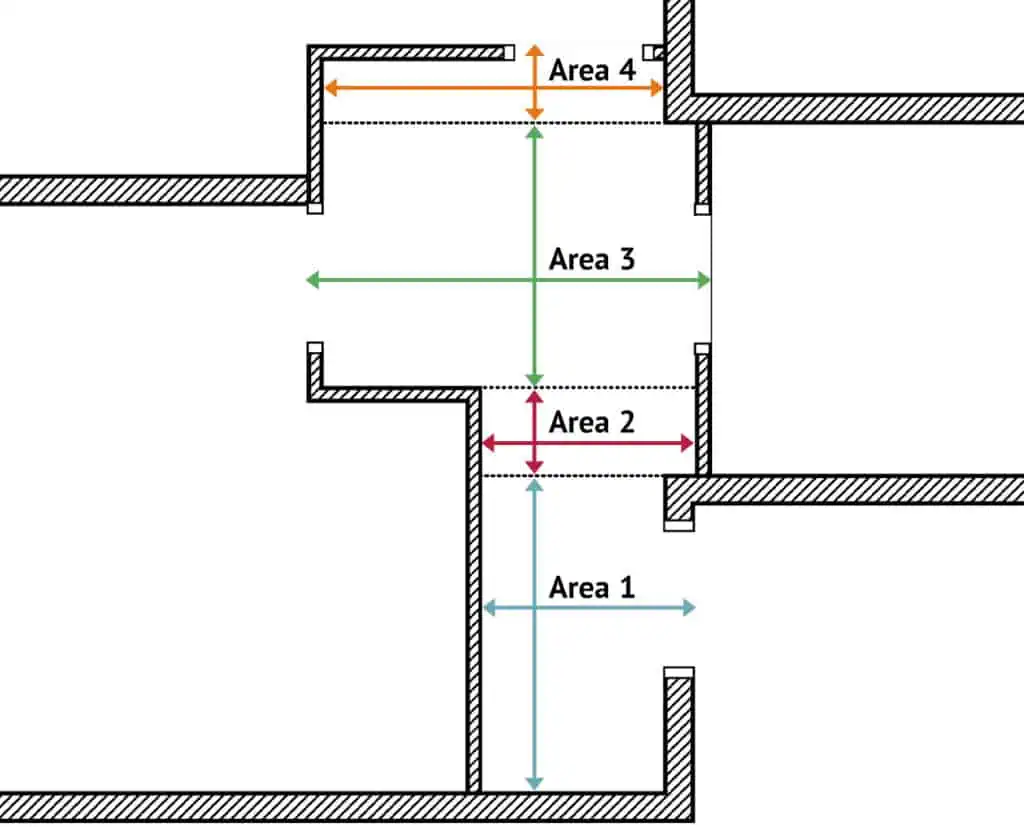
For each square/rectangle, measure the width and length in centimetres and record it on your diagram. Ensure you measure the widest points, which should include into doorways or recesses. If you have particularly large or intricate individual areas, place a small object on the floor to act as a marker to help identify the point you have measured up to.
At least one part of your landing will meet your staircase. There is no need to include the riser of the first stair in your landing measurement; it’s much easier to measure just the landing itself. Make a note separately of the height and width of the stair riser and include this in your totals later.
Calculating the area
You will likely end up with several measurements for the different squares or rectangles which comprise your landing. Convert your centimetre measurement into metres (by dividing by 100) and for each smaller area of your landing, multiply the length (metres) by the width (metres) to give you the square meterage.
Add these subtotals together to give you the total square meterage of underlay required for your landing.
How to measure half landings
Half landings are essentially just large steps (most likely square or rectangular in shape) part way up your staircase.
You should take the height/depth measurement by holding your tape at the back of the half landing, folding it over the edge of the stair and taking a note of the measurement where the landing meets the next step below.
The width of the landing should be taken by recording placing the tape on one side of the widest part of the landing and running your tape to the opposite side.
Measurements taken in centimetres should be converted into metres, then the two figures multiplied together to obtain the square meterage of underlay needed to cover your half landing.
How to measure straight stairs
Straight stairs are those which are rectangular in shape, with approximately the same measurements on the left and right hand side of the step.
These are the easiest part of your project to measure and will involve obtaining two simple measurements: the combined measurement of the tread and riser, and the width of the step.
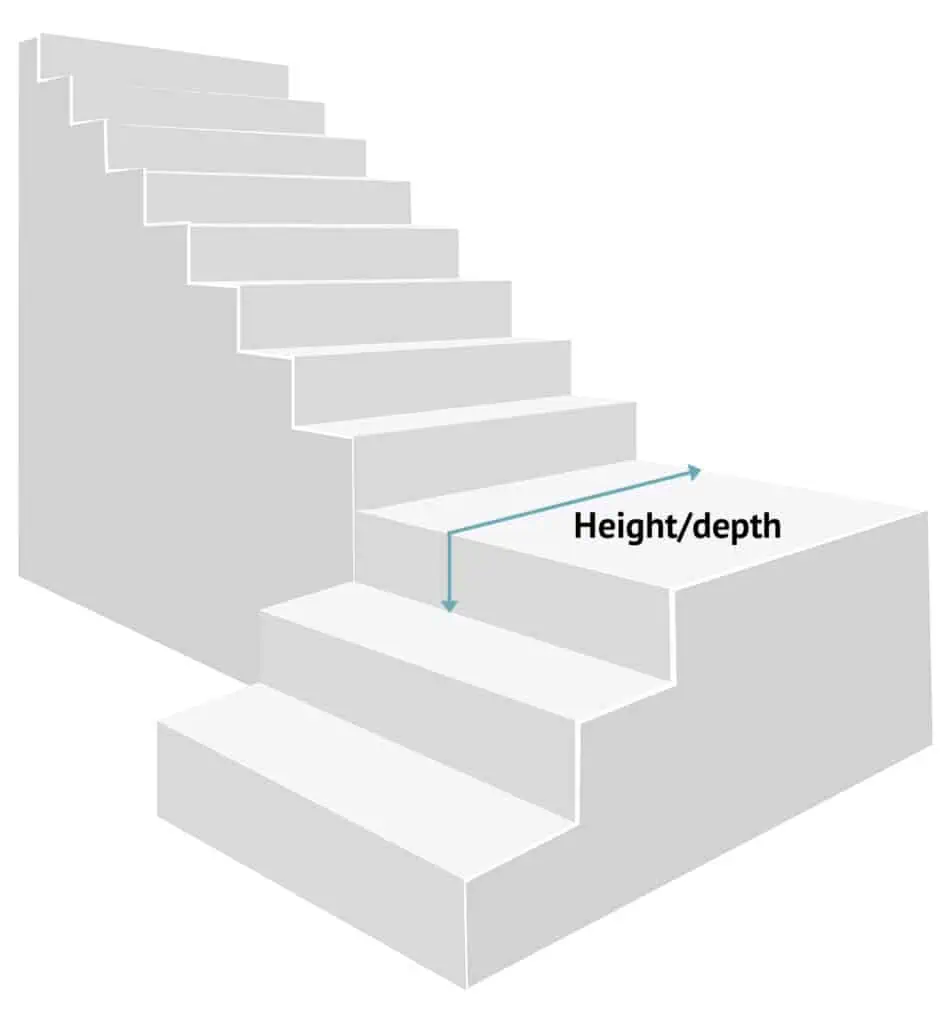
Start by putting the tape at the back of one step, where the tread meets the riser and bend the tape over the edge of the step noting the length where the tape meets the next join of tread/riser. This is the depth/height measurement for one step.
Your measurement should be somewhere between 35-50 cm. The likelihood (especially in newer houses) is that each straight step will measure the same as each other on the staircase, but you may want to check a couple of other steps to ensure they don’t vary too wildly.
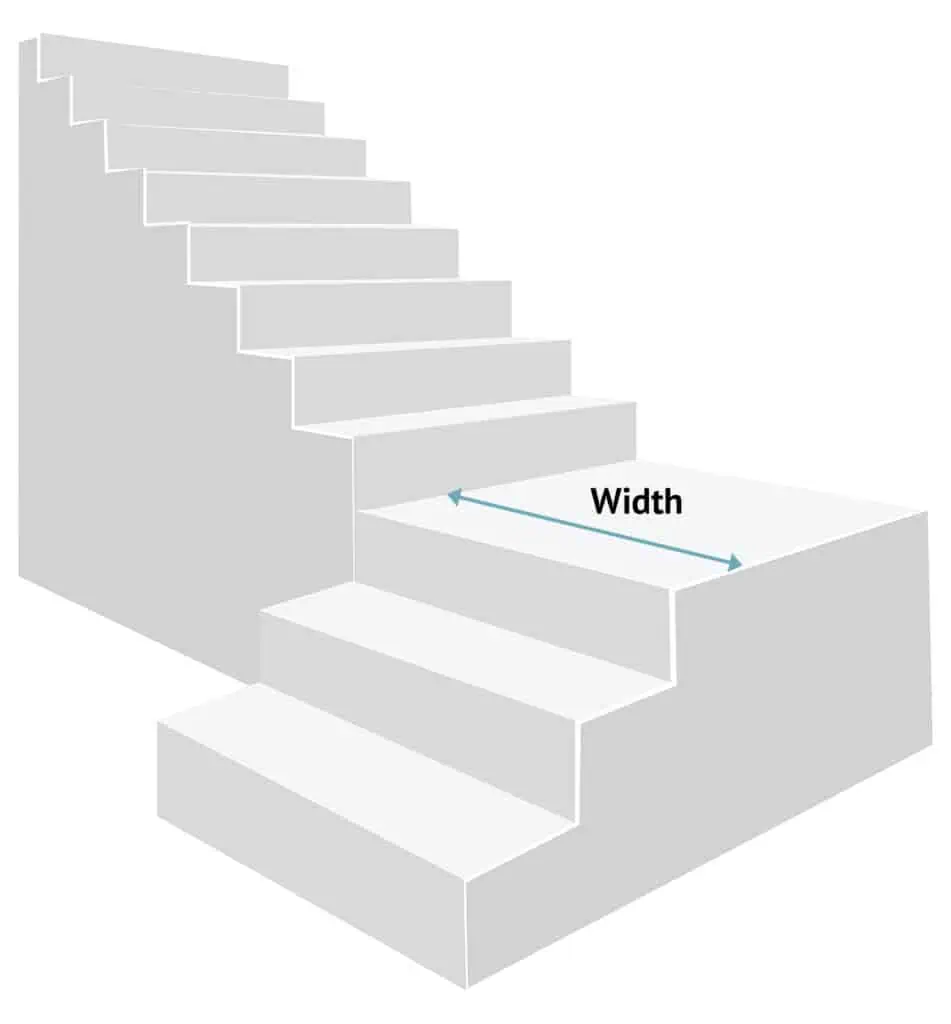
Next, obtain the width of the straight steps. Simply place your tape on one side of the step, lay across the full width of the step and record your measurement.
Step widths can vary greatly, but most stairs have a width between 70-100 cm. Note: if you’re having a stair runner, the width will be the width of the runner itself.
Calculating the area
Once you have the two measurements above (tread and riser combined, and width), convert them into metres by dividing your cm measurements by 100.
For example, 45cm becomes 0.45m, and 80cm will be 0.80m. Multiply these two measurements together, to determine the m² of one straight step (0.45 x 0.80 = 0.36m²).
Next, count the amount of straight steps you have. You should end up with a round number. Many houses, which only have straight steps for their staircases, will have 13.
Finally, multiply the total number of straight steps by the m² needed for a single step to get the total amount of underlay required for your straight steps. In the example above, 13 steps x 0.36m² per step = 4.68m² total area.
How to measure winding stairs
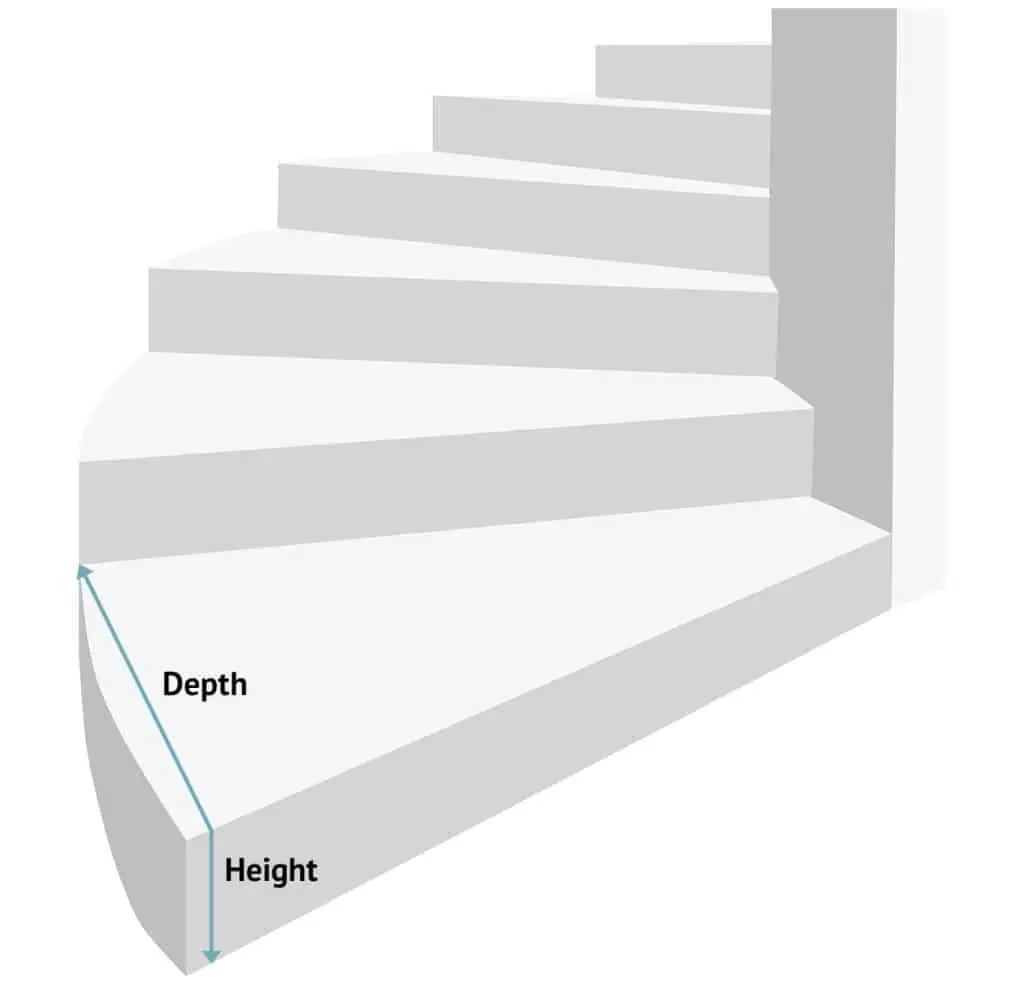
Winding stairs are found where staircases turn around corners and will usually be sets of 2, 3 or 4 individual steps. You may have more than one set of winders on your staircase. Looking from above, these steps will be triangular or ‘kite’ shaped and although they look slightly trickier to measure, you still need to obtain just two measurements in order to calculate their area.
The length (or height plus depth) measurement of the winder is found by placing your tape measure at the furthest point back of the tread of the stair and bending it over the lip of edge of the step at 90 degrees to the lip itself.
Take a note of the measurement where the step below meets the riser.
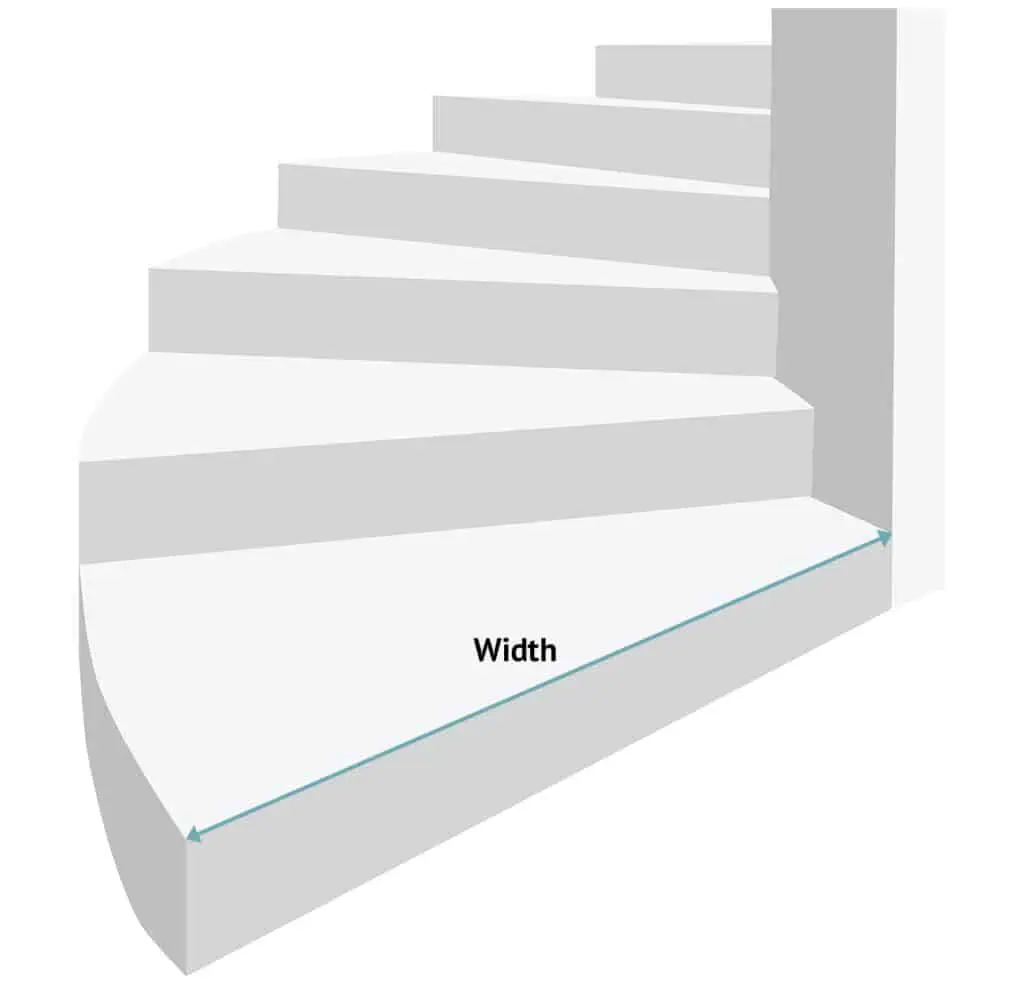
The width of the step is taken by measuring the width of the tread at its widest point. This may be at the front or back of the step or will be the top to bottom of any kite-shaped riser.
Calculating the area
Again, convert these two measurements into metres and multiply the two to get the overall square meterage of the step.
Winder steps require you to order slightly more underlay than the net amount actually required, so by following the above process, you will end up with some waste. This unfortunately can’t be helped – it’s just the nature of how triangles are cut from squares.
You may be able to use these relatively small offcuts to patch in gaps elsewhere, but don’t worry too much, the amount of waste overall will be minimal.
How to measure a bullnose step
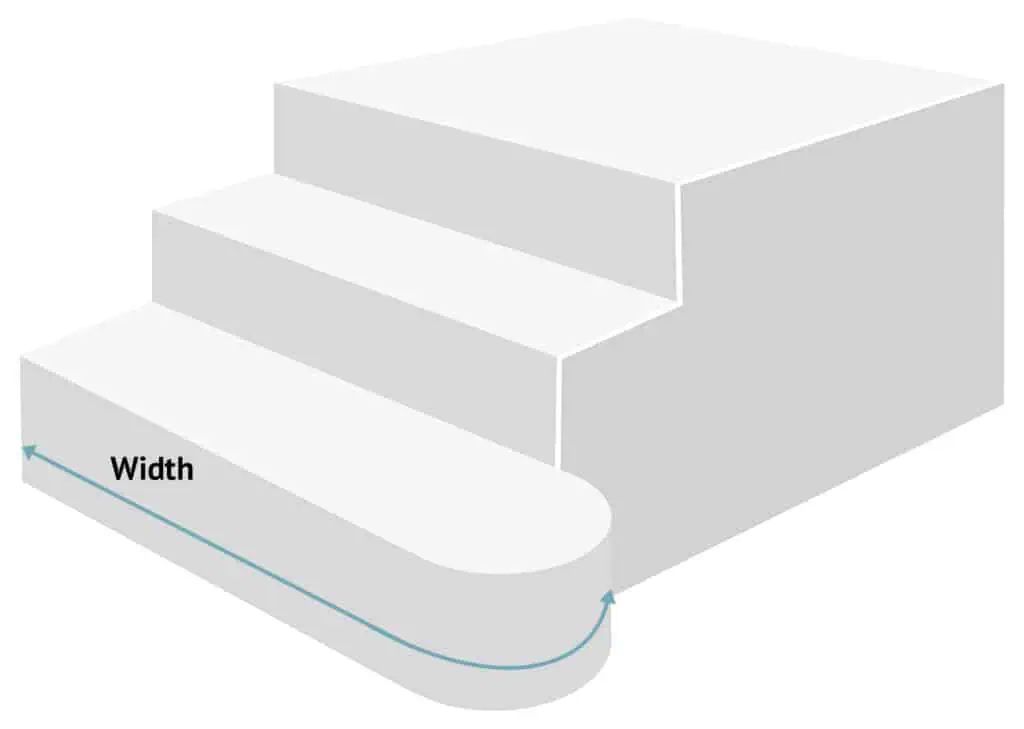
A bullnose step is used for decorative purposes and is most likely found at the bottom of your staircase. They will have a rounded corner on either one or both sides and will almost always be the widest step on your staircase.
The width of a bullnose step should be measured by placing your tape measure on one edge of the riser (this may wrap all the way round the back of the step) and measuring to the other edge of the riser.
The expected measurement here can vary greatly, but as a general guide, will be 20% larger to double the width of your other stairs.
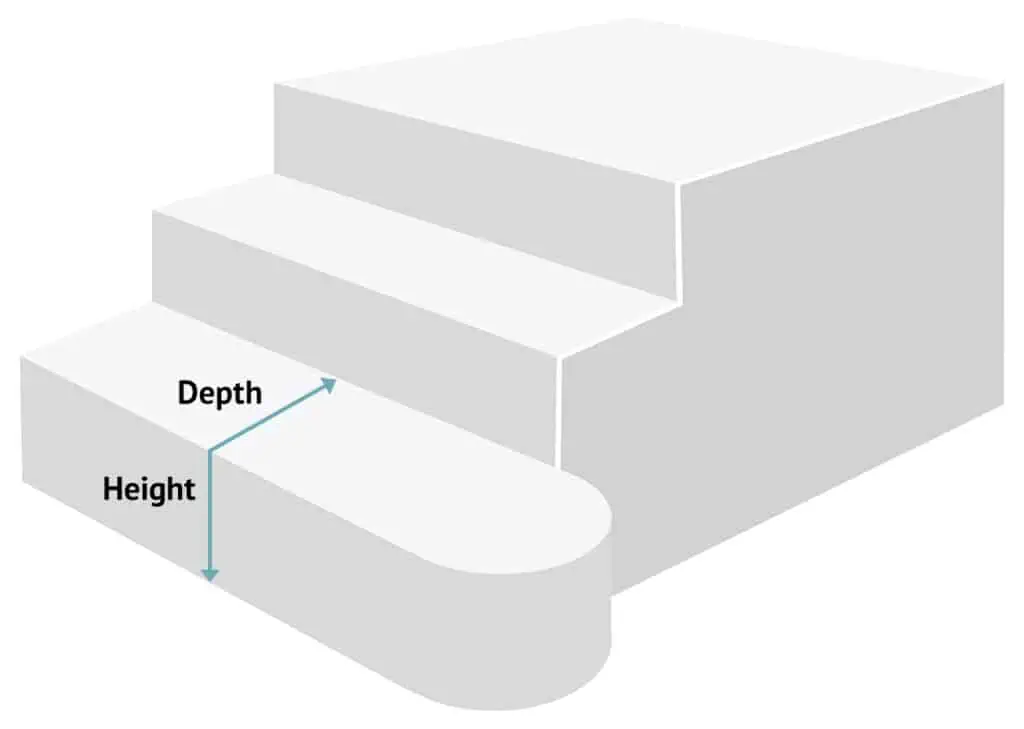
Bullnose steps tend to be similar in height/depth to the other stairs. Measure from the back of the step where it meets the riser of the above step and fold your tape over the edge of the stair to include the height of the riser in your overall measurement.
Once converted into metres, multiply the two measurements together to calculate the amount of underlay required to cover your bullnose step.
How much underlay do I need?
Once you have collated all your measurements, you will need to calculate how many bags of underlay you require.
Add together the square meterage you have calculated individually for landings, half-landings, straight steps, winders and bullnose steps to arrive at a net total.
You can then divide this net total by the amount of metres squared in one bag of your chosen underlay, to give you the number of bags required.
Lastly, round this up to the nearest bag and you have the number of bags needed for your project.
Example calculation
For example, if we have the following measurements:
- Landing: (3.2m x 1.4m) + (3.2m x 2.6m) + (3.2m X 0.83m) = 15.46m²
- Straight stairs: (0.45m x 0.75m) x 12 steps = 4.05m²
- Bullnose step: (0.45m x 1.1m) x 1 step = 0.5m²
- Total of all areas: 15.46m² + 4.05m² + 0.5m² = 20.01m²
- Amount in a single bag of chosen underlay: 15m²
- Bags required: 20.01m² / 15m² = 1.33
- Bags to order: 2
As you can see, sometimes you may be left with part bags of underlay. If this is the case, don’t throw it away; try using it as extra loft insulation or put it under the feet of your sofa to prevent indentations in your carpet.
Top 5 tips for measuring stairs
Here are our top 5 tips when calculating the area of your stairs and landing:
- Sketch a plan of the areas to be measured
- Mark off each area once measured
- Measure the longest dimensions of each space – including into doorways and recesses
- Double check your measurements
- Slightly over ordering is better than not having enough
Need more help?
If you need any assistance working out the amount of underlay you require for your project, please do not hesitate to contact our sales team on contact@simplyunderlay.co.uk.
We will be more than happy to help.